Friday, June 13, 2008

Help Blocked Lock On Suitcase

left side of the engine - Crankshaft Seals Engine Assembly

In the operation of closed transmission housing we have seen that we have no Crankshaft focused.

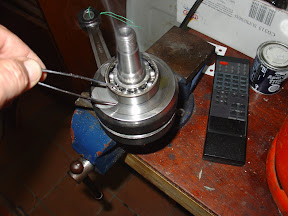
Now is the time to do it, measuring with a caliper the distance between the crankshaft bearing and its housing in the crankcase. How far will we surely different, they will warm the outside of the housings of the bearings, and very gently tapping ends of the crankshaft will move the joint corresponding to the appropriate side, until we stay focused. Going for slaughter

no harm in moving the bearings over the neck of the crankshaft, as the heat given off by the outside take to reach the inner ring of the bearing, so that if we go faster, it will dive and what moves is the outer race of each bearing.


Crankshaft Seals are installed in a side covers. Between the outer circumference of the caps and pan support in place a board, and between the inside of the lid and the outer race of a corresponding bearing spacers.

The play is at once placed the lid, both on the outside and inside the casing on the bearing are to stop without any backlash.

We measured the thickness of the board ...


... and the step height inside the lid.


Known distance between the bearing outer race and the circumference of the lid support on the case (we have measured the centering operation, and if not, re-measure) we can calculate the thickness of spacers placed.

For example (invented):

flap step height: 5.00 mm Thickness
board: 1.00 mm (0.90 mm consider, since the board is compressed by tightening the lid)
Total step after mounting the lid: 5.00 to 0.90 = 4.10 mm

bearing outer race distance - the supporting surface of the lid on the pan: 4.40 mm

Difference: 4, 40-4,10 = 0,30 mm thick washers to mount.


not necessary to go to the thickness of the washers, cold as the outer race of bearing balls tighten it against the inside track and will be completed offline. On the other hand do not have to suffer for leaving the minimum clearances minimorum, for in the crankcases operating temperature dilate more than the crankshaft, and these gaps grow, so there's nothing forced. For


assemble the spacers ...


... board put the lid ...


... insert retainer in the lid ...


... and assemble the set.


catch in left (clutch side) are placed three Allen screws holding a plate ...


... that we turn when they are tight.


On the left side (on) follow the same process ...


... with the only difference that the clamping screws the floors are flat head screwdriver.


Note: to check that everything turn well, you'll notice an increase in resistance to the covers mounted. Normal is the friction of the seals.

Thursday, June 12, 2008

Thank You For Sharing Your Special Day With Us

- Semicárteres

Air

For semicárteres assembly, once checked the clearances of the axes, we assemble the two primary and secondary axis with the selector drum, as explained on the right crankcase, which is supposed to already have assembled all seals, bushings and bearings. Do not forget to mount the necessary spacers we have planned in the previous setting change.


implementation mechanism

From outside the crankcase insert the shaft of the implementation.


Place washer spring support ...


... and the dock separator mobile gear start.


introduce the pinion, the small ramp leading to move ...


... and tab then said pinion stop, not forgetting to place and tighten the nut and washer that attach outside the crankcase.


We insert the large sprocket implementation, which we note is always geared to 3rd gear pinion on the shaft. In this manner, when you turn the start shaft, the pinion is traveling, meshes with the large sprocket, and it turns the transmission main shaft (check). When you turn the input shaft rotates the clutch. If it is disconnected, move the primary drive and this to the crankshaft, cranking for starting. Therefore, if we press the clutch (clutch) the implementation does not work.


not forget the last thick washer on the large sprocket implementation.


selector shaft
We insert the selector shaft from outside the left crankcase.


For crankcase placed inside the washer ...


... and the circlip from the shaft.


Note that is also threaded stud closed blind motor into the left crankcase. Crankshaft


Once assembled crankshaft bearings, heat your accommodation in the right crankcase. This will make it easy to place the crankshaft in it.


The crankshaft bearing finds no cap on the crankcase, so you can enter freely until its counter friction with the walls of the pre-compression chamber. To avoid this extreme, but as of now we can not focus perfectly the crankshaft, we will only leave a small clearance to rotate freely.


change Closed

We put the two centering bushings and gasket crankcase oil a little, over the right crankcase.


Before closing the housings threading, if not already done so, the closed blind screw them (a stud that is threaded into the crankcase through the left and right, to tighten with a nut from the outside.

Heat the crankcase left for the bearing for the crankshaft (which is mounted on the crankcase right) enter without difficulty.


We put the left on the right crankcase. Have to enter easily without hitting or pushing. Neither should insert tightening the bolts connecting the semicárteres, let alone them being hot. The bend can be desplaneará the board and we will have bundled fat. You are warned.

If not go in easily, it pulls back, reheated and try again.


asparagus Then insert the semicárteres binding. On the left side is placed a nut and O ring to prevent oil flow, and on the right side a flat washer, and nut grower.


we will tighten the nuts slowly, following a cross pattern to avoid damaging the board.

A while after closing the housings retighten the nuts, when everything is already set at room temperature (the aluminum will have contracted something and may be loose).

Wednesday, June 11, 2008

Best Shampoo Thermasilk

Motor Mount - Mounting

mounting of the piston in the connecting rod is also essential to counter the heat. There are piston pin pusher, but all that is forcing do not like. Obviously, it goes without saying that the bolt assembly is absolutely prohibited hammers, mallets, pots and other tools to give blows.

The best way to mount the piston is to heat it at 160 º C. Here I put a picture of the oven that I use. An oven vulgaris. and not to panic, which is not the kitchen oven, but one apart from a demolition.


We insert the connecting rod bearing, or cap, as mountain bike.


We take the piston (burning, burning) ...


... we present rapidly in the connecting rod (burning, burning) ...


... and without wasting time we put the pin pushing with your finger. Enter without effort. We must go quickie, before the bolt itself dilate the piston heat transfer.


After installing the bolt, put the clips of it and let cool completely before assembling the cylinder follow.


Tuesday, June 10, 2008

Top States For Disabled

piston engine - the crankshaft bearings

I present here the definitive way to mount the bearings on the crankshaft. Made in Toti "Il Professore".

is based, as in any assembly of bearings, on the principle of expansion under the action of heat. If dilate bearings, enter it in the neck crank at room temperature.

heater shape as uniform as possible is to "fry", ie immersed in hot engine oil.


When oil begins to boil, and we can take and insert into their seats. They come lubricated butt, so go fine fine.


The left mounted in this manner, so that it cools the conjutno are well placed on your site, and herding.


a finding
All mounting method.